Overview
Snowsight is Snowflake's new User Interface that harnesses the power of Snowflake's Classic SQL support into a simple to use interface. Snowsight has replaced the classic Snowflake interface for new organisations that signed up from 30th May 2023.
Through Snowsight, users will be able to:
- Build and run queries
- Monitor query performance and copy history
- Create and manage users and account permissions
- Create and use virtual warehouses
- Share data with other snowflake accounts
- Explore listings and share data to the market place
Snowsight allows users to share either SQL or Python worksheets and folders (containing worksheets) with other users who have signed into Snowsight previously. Alternatively a link can be forwarded to the intended recipient(s), which allows them access to the worksheets.
Visual charts can be easily created from the results of a SQL query. Such charts include: Bar, Line, Scatterplot, Heat Grid, and Score Cards. Dashboards can be created containing tiles that are turned into charts derived from the results of sql queries.
Administrators can also monitor queries that have been run, and access metrics such as:
- the duration of the query
- the number of rows returned
- the time of execution
- and the quantity of data to be scanned by the defined query
Practical Demo: Creating a Basic Dashboard
The aim of this exercise is to create a basic dashboard. Here is a brief video demonstrating how one can create a dashboard using Snowsight.
We will now take you through the detailed steps and guide you through the process of creating a dashboard from start to end.
Prerequisites
Ensure you are logged into Snowflake and that you select the Snowsight UI (not the classic UI). This can be done by two ways:
Method 1: Switching from Snowflake Classic Interface to Snowsight
Clicking on the Snowsight Icon, provided you are logged in within the Classic Console Interface.

You will be asked to login again using your Snowflake credentials.
Method 2: Setting Snowsight as a default Interface
When you are logged into Snowsight, click on the drop-down arrow on the top left of your screen (below your Initials).

Click on the Profile option.
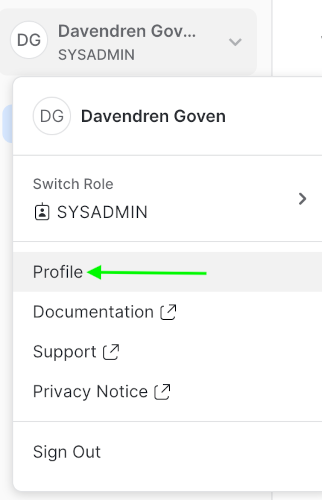
Scroll down the dialog and change the Default Experience to Snowsight.
Click on Save.

Planning Your Dashboard
Understanding what your aim is
Before creating a Dashboard, it is important to understand the aim of the designated dashboard. Dashboards are usually created for different reasons and one of the main reasons is for meetings/presentations to key stakeholders. The aim is generally to tell a story using the dashboard of the data.
Understanding your data
The next step is to understand that dataset you are working with. Understanding what the data is indicative of, how the data within the different tables are related and key metrics and attributes.
What is the difference between a worksheet and a dashboard?
A Snowflake Worksheet allows the user to write and run either SQL or Python queries on a sheet. A dashboard comprises of various different tiles (written using SQL queries) to output a chart. These charts are then added to the dashboard.
Writing custom SQL queries within your dashboard
This demonstration will create charts using the queries that are provided below.
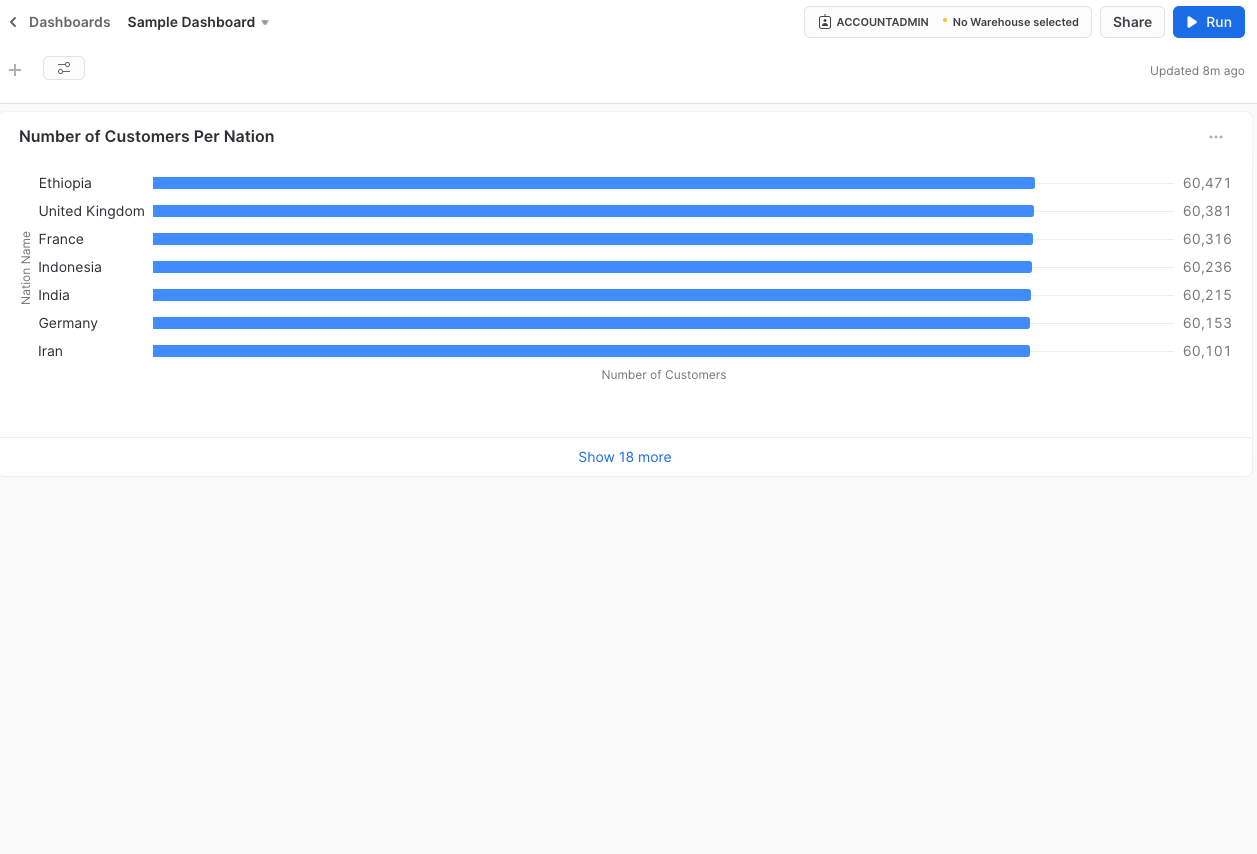
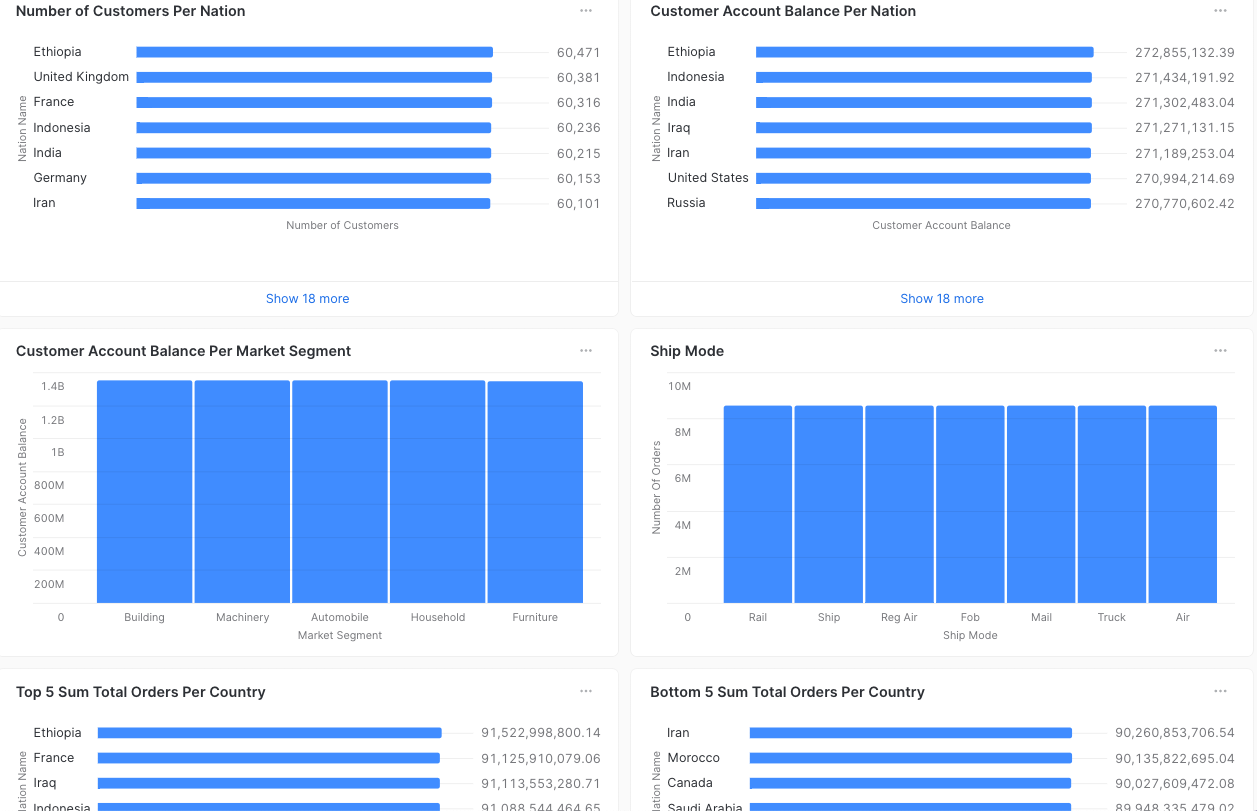
Number of Customers Per Nation
SELECT COUNT(DISTINCT c.c_name) "Number of Customers"
    ,INITCAP(n.n_name) "Nation Name"
 FROM SNOWFLAKE_SAMPLE_DATA.TPCH_SF10.CUSTOMER c
 INNER JOIN SNOWFLAKE_SAMPLE_DATA.TPCH_SF10.NATION n ON n.n_nationkey = c.c_nationkey
 GROUP BY n.n_name;
Customer Account Balance Per Nation
SELECT SUM(c.c_acctbal) "Customer Account Balance"
    ,INITCAP(n.n_name) "Nation Name"
 FROM SNOWFLAKE_SAMPLE_DATA.TPCH_SF10.CUSTOMER c
 INNER JOIN SNOWFLAKE_SAMPLE_DATA.TPCH_SF10.NATION n ON n.n_nationkey = c.c_nationkey
 GROUP BY n.n_name
 ORDER BY SUM(c.c_acctbal) desc;
Customer Account Balance Per Market Segment
SELECT SUM(c.c_acctbal) "Customer Account Balance"
    ,INITCAP(c.c_mktsegment) "Market Segment"
 FROM SNOWFLAKE_SAMPLE_DATA.TPCH_SF10.CUSTOMER c
 INNER JOIN SNOWFLAKE_SAMPLE_DATA.TPCH_SF10.NATION n ON n.n_nationkey = c.c_nationkey
 GROUP BY c.c_mktsegment
 ORDER BY SUM(c.c_acctbal) desc;
Ship Mode
SELECT COUNT(o.o_orderkey) "Number Of Orders"
    ,INITCAP(l.l_shipmode) "Ship Mode"
 FROM SNOWFLAKE_SAMPLE_DATA.TPCH_SF10.ORDERS o
 INNER JOIN SNOWFLAKE_SAMPLE_DATA.TPCH_SF10.LINEITEM l ON l.l_orderkey = o.o_orderkey
 GROUP BY l.l_shipmode;
Top 5 Sum Total Orders Per Country
SELECT SUM(o.o_totalprice) "Total Order Price"
    ,INITCAP(n.n_name) "Nation Name"
 FROM SNOWFLAKE_SAMPLE_DATA.TPCH_SF10.ORDERS o
 INNER JOIN SNOWFLAKE_SAMPLE_DATA.TPCH_SF10.CUSTOMER c ON c.c_custkey = o.o_custkey
 INNER JOIN SNOWFLAKE_SAMPLE_DATA.TPCH_SF10.NATION n ON n.n_nationkey = c.c_nationkey
 GROUP BY n.n_name
 ORDER BY SUM(o.o_totalprice) desc
 LIMIT 5;
Bottom 5 Sum Total Orders Per Country
SELECT SUM(o.o_totalprice) "Total Order Price"
    ,INITCAP(n.n_name) "Nation Name"
 FROM SNOWFLAKE_SAMPLE_DATA.TPCH_SF10.ORDERS o
 INNER JOIN SNOWFLAKE_SAMPLE_DATA.TPCH_SF10.CUSTOMER c ON c.c_custkey = o.o_custkey
 INNER JOIN SNOWFLAKE_SAMPLE_DATA.TPCH_SF10.NATION n ON n.n_nationkey = c.c_nationkey
 GROUP BY n.n_name
 ORDER BY SUM(o.o_totalprice) asc
 LIMIT 5;
Generating Visuals on Snowsight
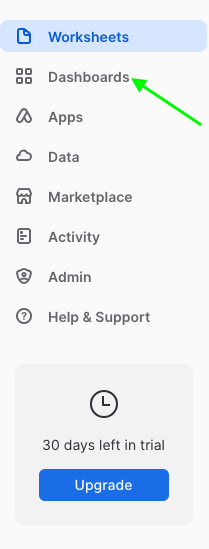
Click on the Dashboards option:
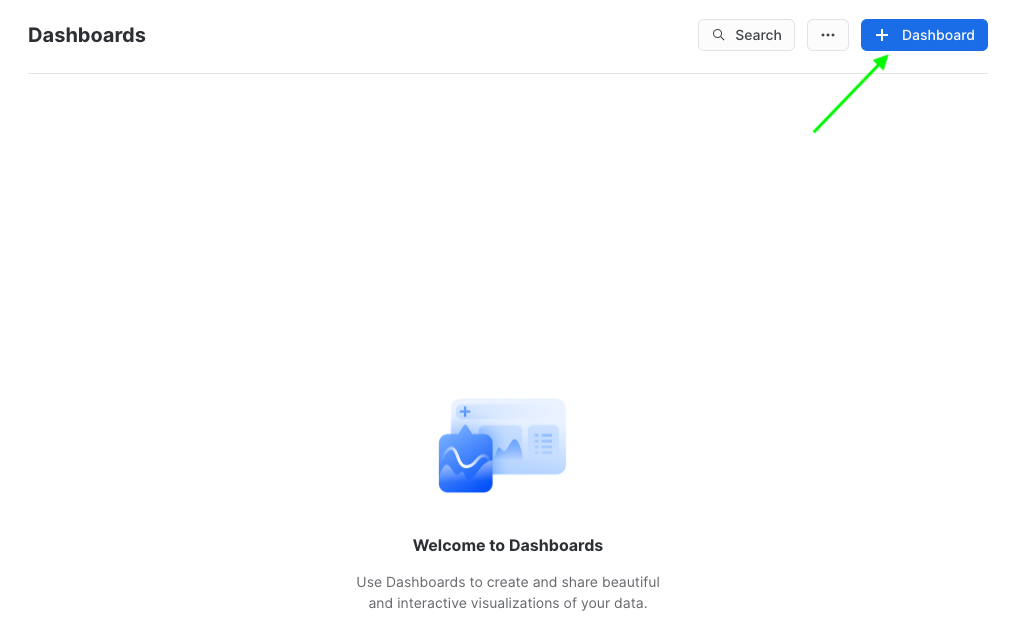
Click on + Dashboard:
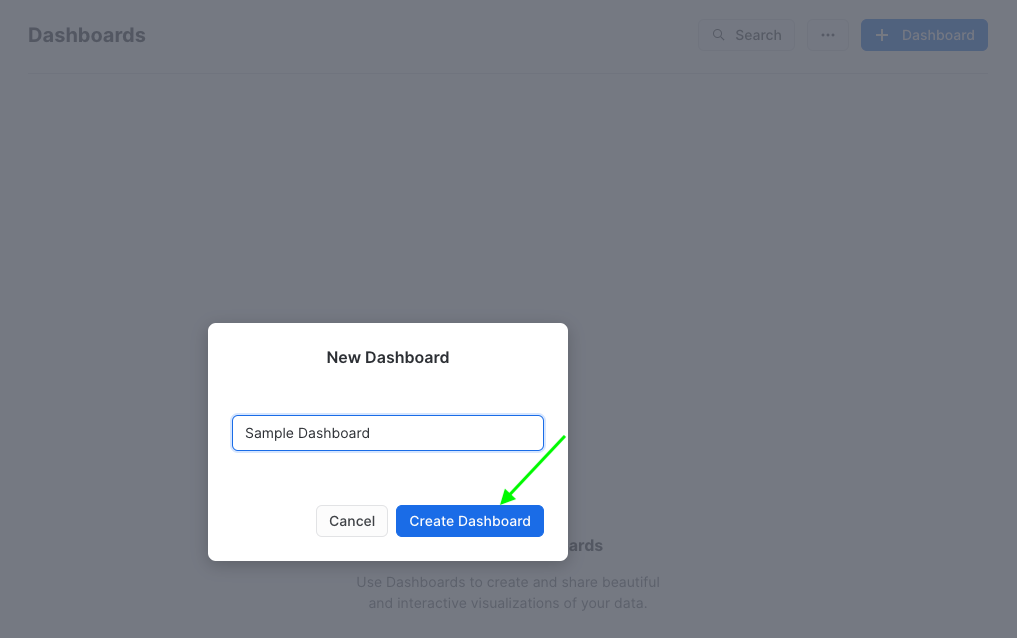
A dialog will be displayed, prompting the user to enter in the dashboard name.
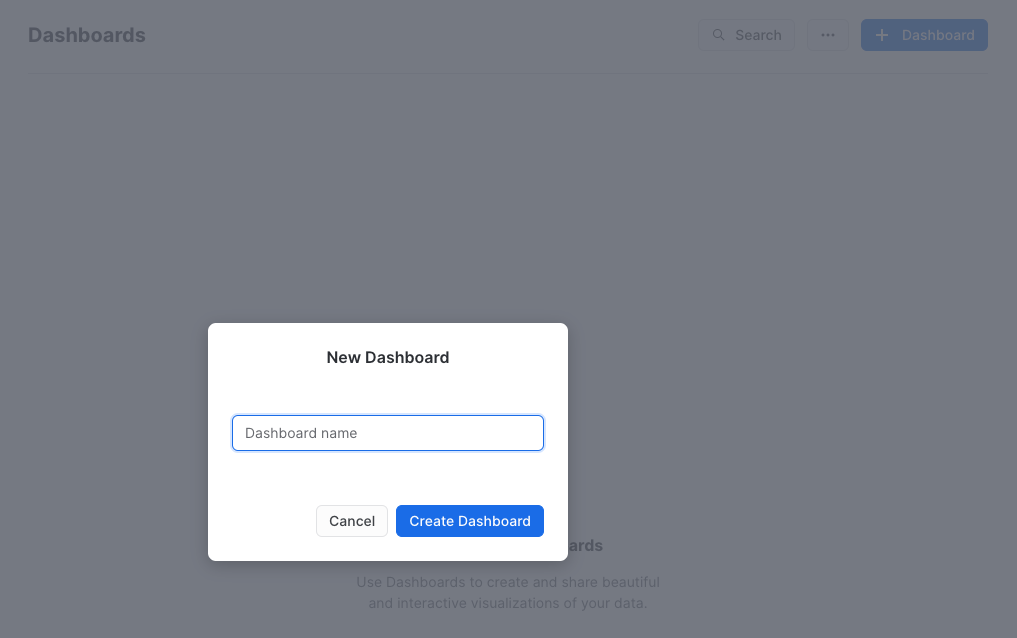
Enter in a suitable name for your dashboard and click on Create Dashboard.
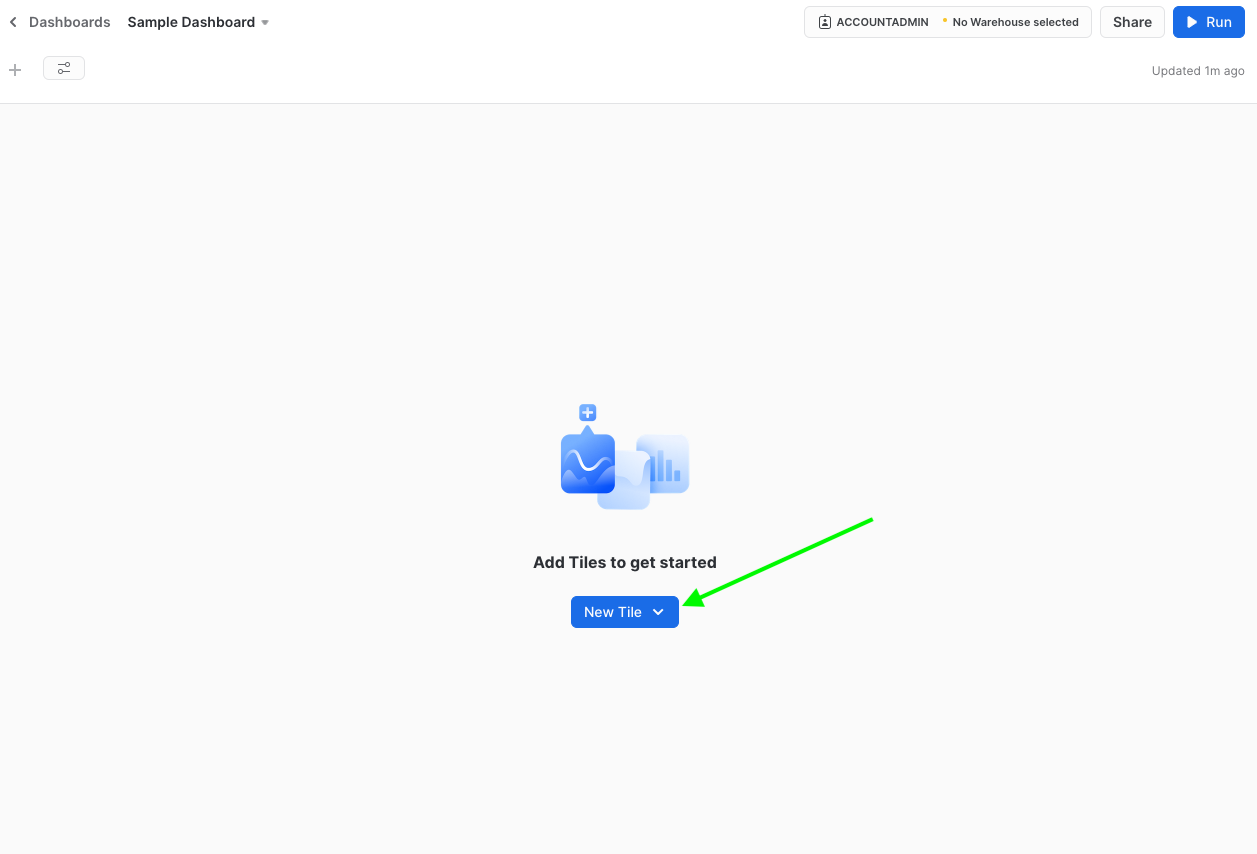
When the new dashboard dialog displays, click on New Tile.
You will be presented with a choice between two worksheets ie. From SQL Worksheet or From Python Worksheet. Select the appropriate option.
The new worksheet will be displayed.
By default the name of the worksheet will be assumed from the current date and time. This name can be edited as and when desired.
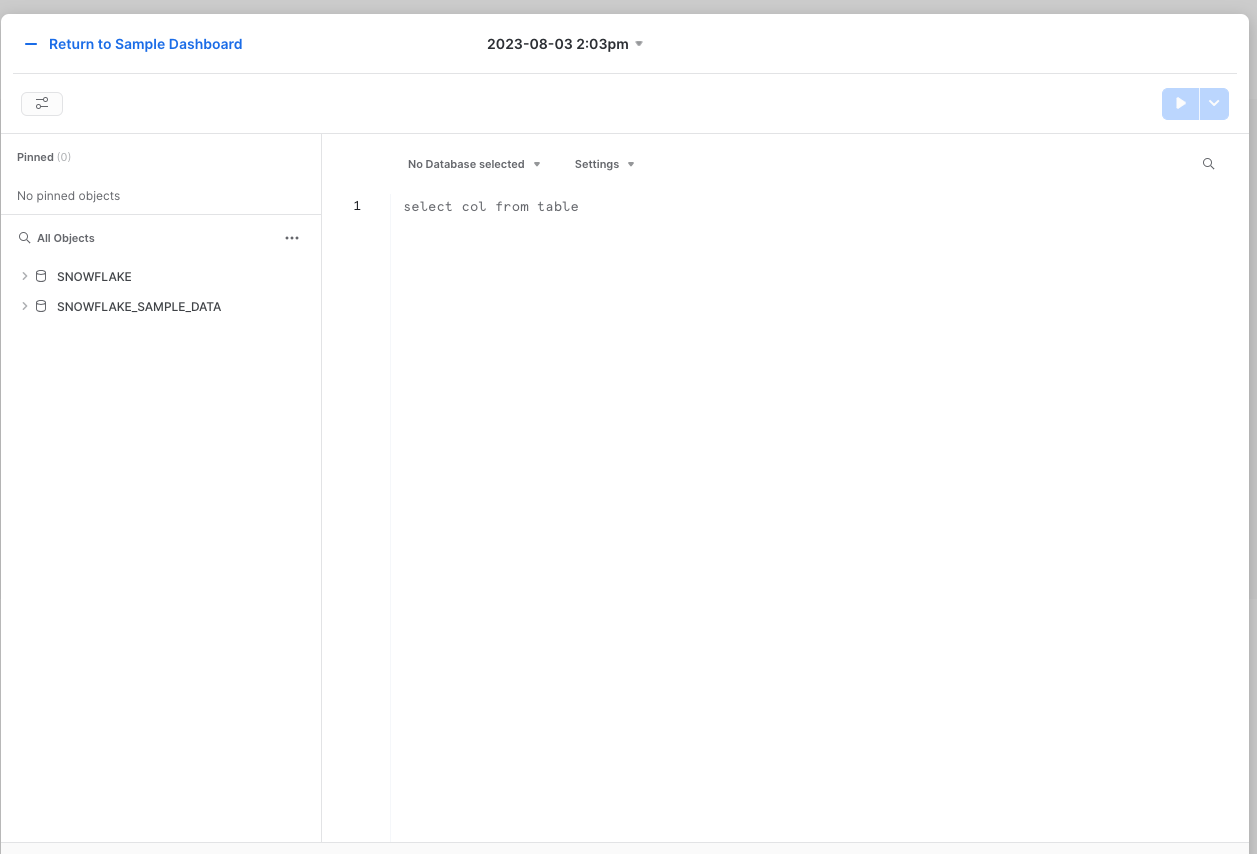
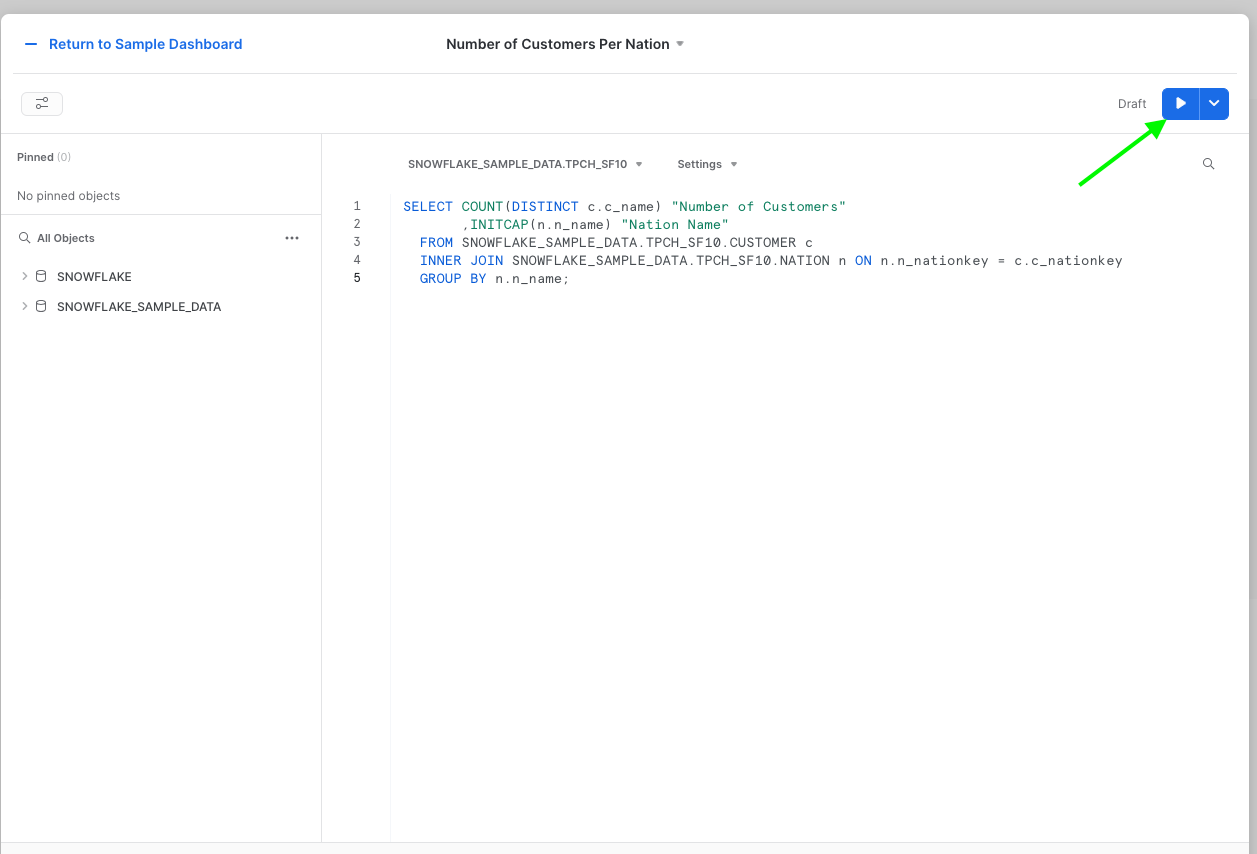
Paste in your custom SQL query which you have previously written.

Set your worksheet parameters:
- Worksheet Name: A suitable name for your worksheet.
- Database and Schema: Define the database and schema.
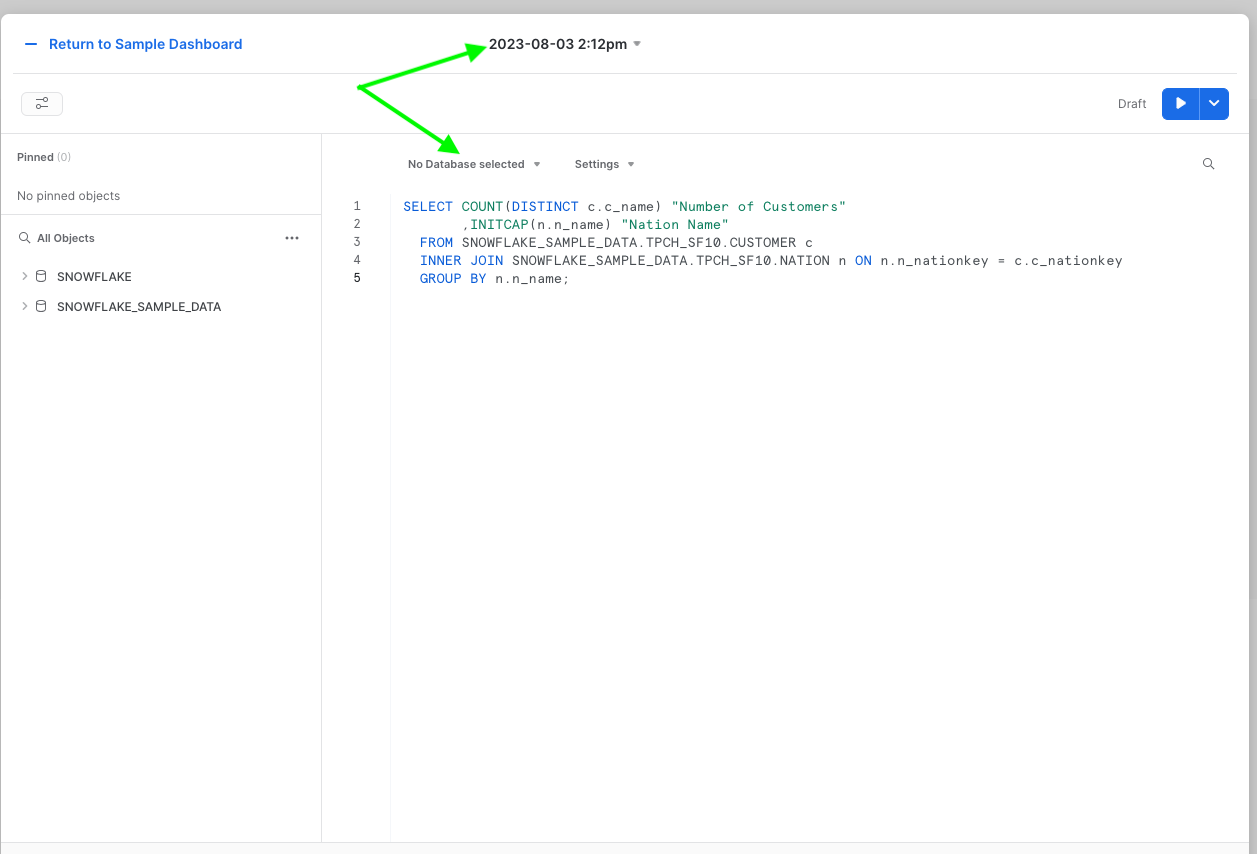
Click on the Run button once all your worksheet parameters have been defined.
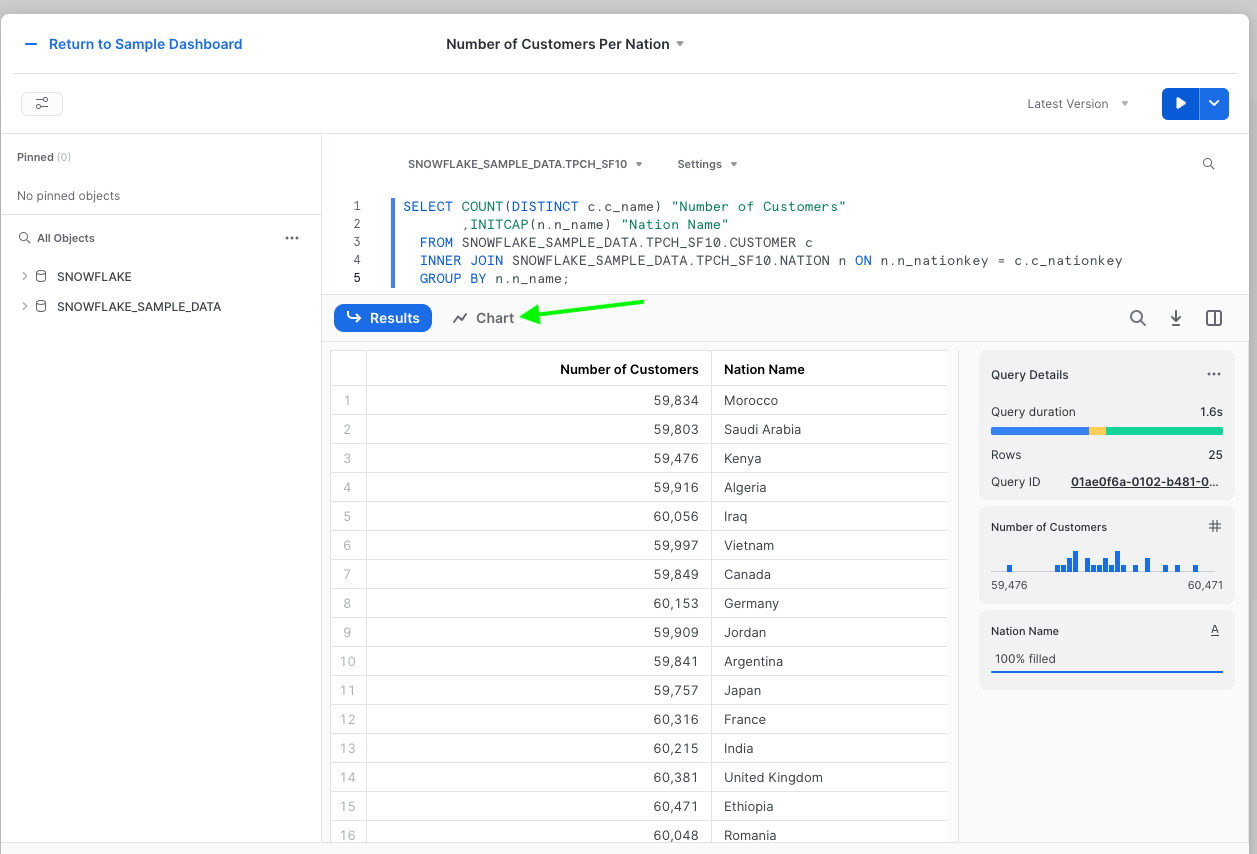
Once the details of the results are displayed, click on the Chart option.
This will allow you to create and customise your charts.
Click on the Chart Type option and select a suitable chart to display the details of your results from your SQL query.
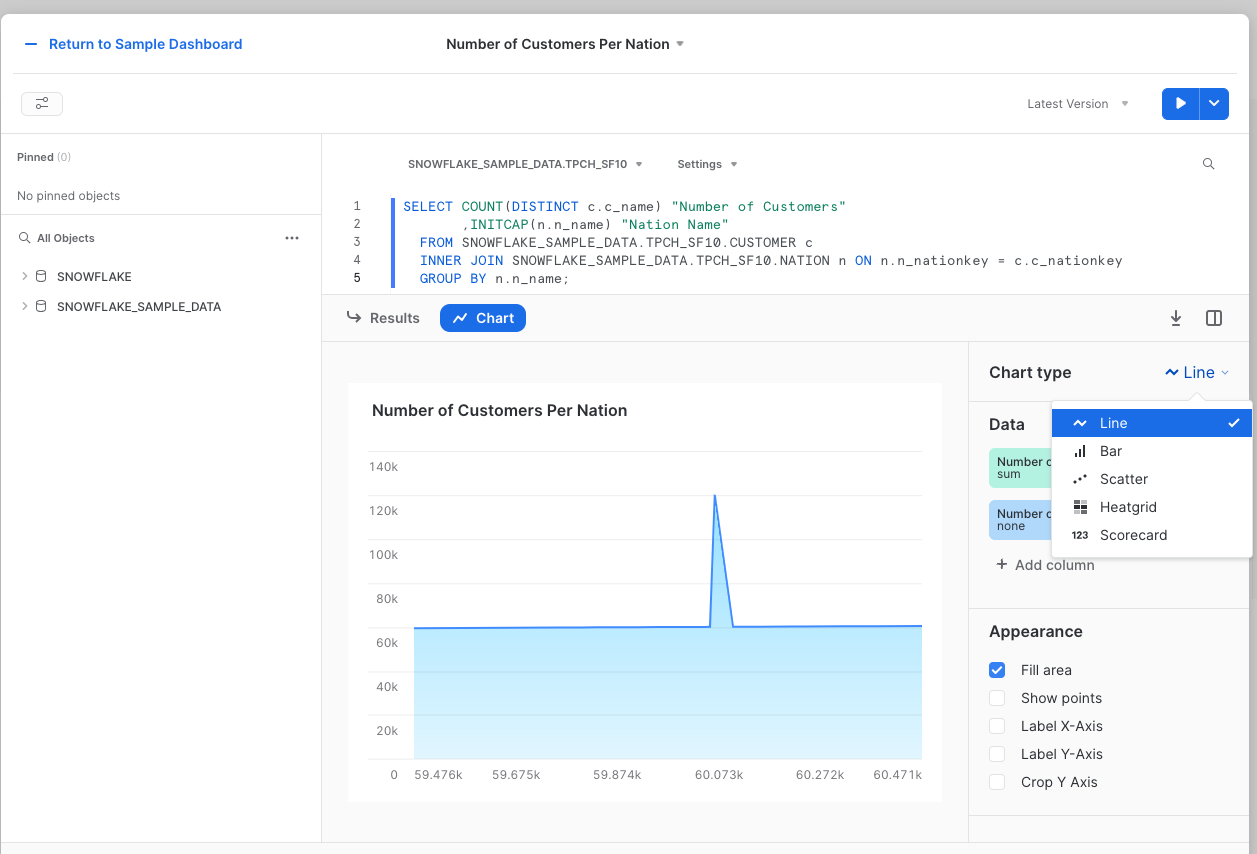
Set the other chart criteria such as Data, Appearance, Orientation and Labels.

Once you have defined all your parameters for your chat, click on the Return to [dashboard name] Dashboard option.
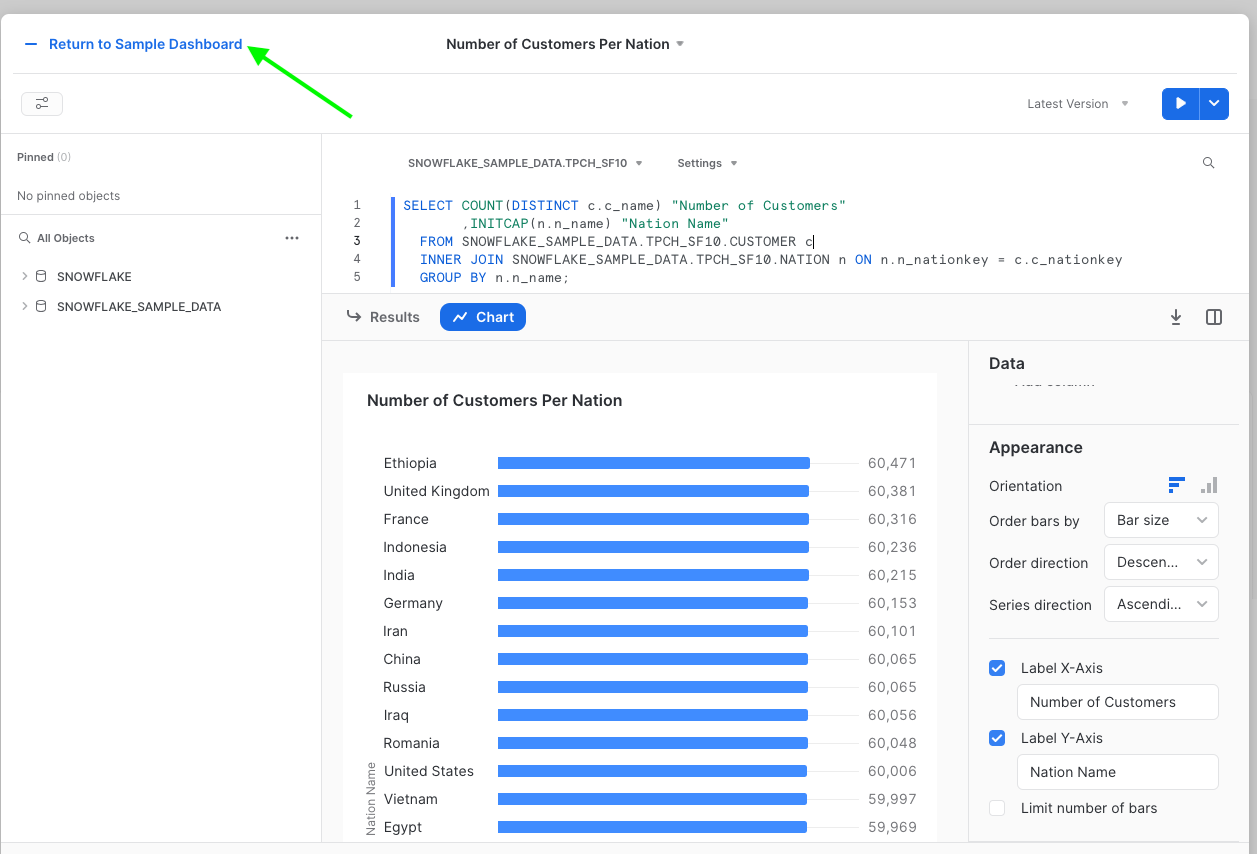
You will notice that your chart has been added to your dashboard.
Replicate this process to populate your dashboard with custom charts based on SQL.
An example of a completed dashboard is found below:
This exercise guided you through the fundamental steps to create a dashboard of different charts representing your data. Enjoy creating your own dashboards to monitor your data!